Saturday, August 31, 2013

Three Apples Card

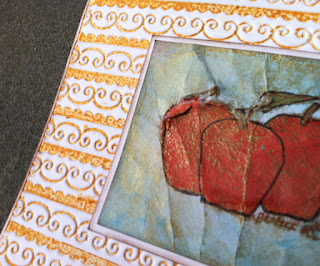
This is a card I made using the letterpress/reverse embossing folder method.  I used an inked Sizzix embossing folder for the background with Distress Ink.  The stamp is by Lockhart.  First I used copics to color the image and then I inked the background with Distress Ink and sprayed it with pearl mists.  I then outline the image with a sharpie.  At the end I crushed the paper into a ball to make it look even more distressed.


Thursday, August 29, 2013

A Birthday Card for David

This is a card I made for my brother David.   It is his birthday Sunday and I just got around to making him this card tonight.  I always have a hard time making cards for men that is why I love these Harley images from my other blog Digital Two for Tuesday.  They always seem to work.


I used the riveted metal embossing folder from Tim Holtz on metal sticky tape from Home Depot.  Then I painted on Vintaj Patina paint by Ranger in Onyx and Clay.  I gently buffed off the ink from the entire surface and then sanded the raised areas.  I stained the images with Antique Photo Distress Ink and Picket Fence Distress Stain.

Friday, August 23, 2013

Another Project Using Martha Stewart Paints - A Mirror

This is a mirror I painted using the new
Martha Stewart Multi Surface Paint and stencils. I am loving this line of paints and stencils.

Friday, August 16, 2013

Hooked Book


Here is a felted cover of a book. It actually is a felted dryer sheet since I did not have any felt. I used Alcohol Inks to color the surface. The spine is rag yarn hooked through a rug hooking base.

Friday, August 9, 2013

A Stroll in the Park


Here is a card I made using one of the Two For Tuesday digital images. The edge was made using an edger punch from EK Success. The safety pin is Tim Holtz and the flowers are Prima.

Friday, August 2, 2013

H is for Home

Stamps are by OI and Invoke. Inks are Distress.

Friday, July 26, 2013

A Black Eye Susan Barrette using Sizzix Susan's Garden Die

As a girl born and raised in Maryland, my favorite wildflower is the Black Eyed Susan. All along the highways in my home state you can see them growing. I made sure to plant them at my home in CT now that I am adult to give me that piece of Maryland. So when I saw this Susan's Garden Bigz die by Sizzix I knew I had to have it. I made with the die a Black Eyed Susan barrette for my daughter the other night. I colored the petals and created the the black powder look on the petals with Pan Pastels. I then finished it with a coat of Triple Thick by Deco Art. I glued the flower to the barrette with the same glue I used to put the flower together, The Ultimate. It is extremely strong and great to add firmness to paper projects.


Modeled by my daughter.


Sunday, July 21, 2013

A Beautiful Rose Made With Susan's Garden Dies by Sizzix

Today I experimented more with the Sizzix Susan's Garden dies. This time I made a beautiful rose. I will have to save this and add it to an arrangement or wreath.


It's a Boy Card

A friend is having a baby boy in a week and I made her this cute card.

I used a Sizzix Embossing Folder inked with Archival Ink by Ranger to create the background. The stamps are by Printworks and All Night Media. I stamped the images with Sepia Archival Ink and colored them with Copic markers.


Saturday, July 20, 2013

Experimenting With Susan's Garden Dies

Good morning everyone!  This week I received in the mail a bunch of dies by Sizzix called Susan's Garden.  It is a full line of dies to create flowers.  I fell in love with these as soon as I saw them.  Those of you who have followed me for awhile know that I started this blog to showcase flowers that I made using punches.  My header is a Christmas swag I made for a local scrapbook store that I taught at years ago.

Here is one of my first projects, a flower bobby pin for my daughter to wear.

I used the Flowering Quince Die Set.
I did not follow the directions to make the Quince but created my own fun flower using a light blue polka dot paper.  I cut each of the die pieces once and use all of the pieces.  I ran my Versafine cube in Pinecone along the edges of the petal pieces.  I colored the tips of the stamen with a Copic marker YR65 Atoll.  To glue it all together I used the best glue called The Ultimate.  I glued the petals onto the bobby pin and put a calyx under and over the bottom metal piece.  I then took the pin outside and sprayed the whole flower with Krylon Matte Finish several times. 
I designed this card for my daughter to keep the bobby pins organized.
Here is herself modeling.  It was early so she wouldn't let me take a front shot.  Maybe later.

Wednesday, July 3, 2013

Cool Book Box

I signed up for a fun class by Andy Skinner called Book of Ruination. This is my first attempt at trying the techniques. A lot of the under layers did not show through my top layer.

I used Decoart Americana and traditions paints. The box was from Hobby Lobby. The die cut houses are Tim Holtz and I used a Tim Holtz embossing folder for the line and dot pattern. The texture technique on the box is from the class as well as achieving the rusty look on the die cut.

I used Tim Holtz tissue tape on the sides and stained it with Distress Stain.

Here are a few close ups of the rust technique.


Thursday, June 13, 2013

Stenciled Journal Page

This is a journal page I made on the weekend. I used the tag I made previously as a design element. The background of the page was made using several layers of stencil designs. I used a combo of Distress Paint Dabbers and Silks.
I think this page still needs something. I will let it sit until next weekend and see if I am inspired.


Tuesday, June 11, 2013

Repurposed Wallet Tin

My husband bought a new wallet and it came in this great tin. My daughter and I decided to do a make over on it using stencils and Distress Paint Dabbers. This box will be used to store jewelry.


Thursday, June 6, 2013

More Fun with Stencils

I got home from work yesterday and there was a package. It was the stencils I had ordered from Green Pepper Press/ Michelle Ward. Of course I could not wait to play so I made this quick tag.

This tag used three different stencils. I added the color using Distress Inks.

This is the reverse side of the tag.


Tuesday, June 4, 2013

Portrait on Stone Paper

I picked up a pad of Stone Paper at Walgreens on the weekend. It is a smooth surfaced paper made from stone instead of wood pulp. After outlining the face with a Faber-Castell Pitt pen, I decided to experiment with my Copic markers. They look like watercolor on the stone paper. I was able to use my fingers to manipulate and mix the colors. I mixed a little white acrylic on the face to add highlights. I want to play with the paper a little more before I buy a pad without lines online. They are a lot more expensive than the $3.99 I paid for the lined pad at Walgreens.


Friday, May 31, 2013

54 Card

My husband's 54th birthday is this weekend so I made him this quick card. For the background I embossed a thin foil sheet with a Tim Holtz embossing folder. I then added some Ranger Vintaj Patina metal paint in various colors using a paper towel as an applicator. I dried the surface with a heat gun then gently sanded the surface to reveal the metal again in the raised areas. I stamped the paper with a word stamp by Clearly Vintage. The paper was a scrap from my scrap envelope. The clocks were already on it. The embellishments are all Tim Holtz I believe. I lucked out and found the safety pin with 54 on it. I gently rolled the edges of the paper for a more distressed look before applying it to the metal background.


Thursday, May 30, 2013

Flowers for Inspiration

Our garden is in full spring bloom. I hope these inspire you to create.